Showing posts with label recipe. Show all posts

Sunday, December 9, 2018

Stuffed mushrooms


Ingredients:

12 mushrooms (2-2 1/2" diameter each)
4 oz. (120 g) breadcrumbs
2 eggs
1/3 cup parmesan cheese
1/2 stick celery
1/2 medium onion
1-2 cloves garlic
1 slice bacon
1/3 cup olive oil
10 sprigs fresh of parsley (chopped)
Salt
Pepper

Instructions:
Preheat the oven to 400° F (200° C).

Beat the eggs in a large mixing bowl. Add the breadcrumbs and parmesan cheese and allow them to soak for about 5 minutes.

Stem the mushrooms leaving the caps intact and ready to be filled like cups. Gently twisting the stem may be the best way to accomplish this. 

Place the mushroom stems together with the onion, garlic, and celery in a food processor and chop finely. Dice the bacon by hand, especially if you are using uncooked bacon as this is harder to work with in a food processor. Combine the vegetable mixture with the breadcrumb mixture, adding the diced bacon as well as parsley, black pepper, and salt. Pour most of the oil into the bowl and mix to combine thoroughly. 

With the remaining oil, grease the baking tray so that the mushrooms do not stick.

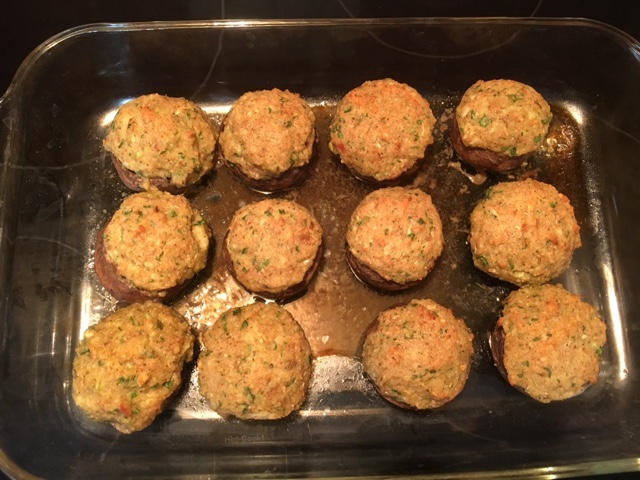
Place the mushroom caps upside down on the baking tray. Fill them generously with the mixture as shown in the photo below.


Bake in the overn for 50 minutes, until they are slightly brown.

Serve and enjoy!


Saturday, February 3, 2018

Sarmale


Sarmale is the Romanian word for stuffed cabbage, and it is considered our "national dish" more than anything else is. Even though people all over the world take meat and rice and wrap a cabbage or vine leaf around it, the Romanians have cultivated this recipe into an art form, and the results are really special. The version here aims to be both healthier and simpler than other versions that you will typically eat in Romania (and find explained in cookbooks and online tutorials), containing less saturated fat and leaner meat than most Romanian cooks tend to use. I prefer to buy my own pork meat and mince it myself at home, so that I know how much fat is in it, and can buy a leaner cut of meat to mince.

In the winter we use pickled cabbage, but in the summer we use green cabbage, and the latter is what I'll be using here.

Image from Pixnio

Choose a cabbage with loose outer leaves, because you will need to be able to detach each of them individually without tearing the leaf itself. For this recipe you need 10-15 leaves. If you happen to have several cabbages of this sort, you might just use the outer leaves from several cabbages for the sarmale. The inside of the cabbage can then be shredded for use later in this recipe, or used for a different recipe like coleslaw.

Place a large pot with water on your stovetop and bring it to a boil with the lid on. Place two or three leaves at a time into the boiling water for about 10-20 seconds each, until the leaves are softened slightly, to make them more flexible and easier to roll. After you have done this with all of them, allow them to cool before continuing.

A tightly-wound cabbage is much harder to use because leaves tend to tear. But if that is all you have to work with, you can proceed in the following manner. Place the whole cabbage in boiling water. Remove it every 15 seconds or so (using protective gloves so you don't burn yourself) and cut or tear off the outer leaves which have been loosened through boiling. Repeat this process until you have enough leaves.


Ingredients for the filling mixture:
  • 1 lb (1/2 kg) minced pork 
  • 1 tbsp vegetable oil
  • 1/2 green bell pepper, diced
  • 1/2 onion, diced
  • 2 tbsp rice or 1 cup boiled rice
  • 1 tsp salt
  • 1/2 tsp black pepper
  • 1/2 tsp dry dill
  • 1/2 tsp thyme
  • Optional: 1 tsp paprika 
You will also need cabbage (obviously) from the beginning of the process. Later in the process, you will need the following additional ingredients (listed separately from the filling mixture above to avoid confusion): 
  • 4-5 oz tomato paste or 2 cups of diced tomatoes
  • 2 bay leaves
  • A dash of thyme
  • 1/2 cup vegetable oil
  • salt
  • Optional: crushed red pepper 
Reminder: these do not go into the filling mixture! 

Mix the ingredients for the filling mixture together in a large bowl.


Then proceed to take cabbage leaves one at a time. Place a spoonful of the filling mixture on a leaf and roll it up tightly, as shown in the videos below.


Repeat until you run out of filling and leaves. This quantity of ingredients should produce about 20 sarmale.


Stack the sarmale inside a slow cooker for the best results. (You can also cook them in a pressure cooker or even an ordinary pot. But the procedures in those cases are very different and not those described here.) Add water to cover all but the top layer of sarmale, plus 1/2 cup oil, the 2 bay leaves, a dash of thyme, salt, and crushed red pepper if you want them a bit spicier. 


Set the slow cooker on high until it starts boiling, then turn it down to low and leave for 4 hours.


After 3 hours, remove the lid and add the tomato paste (or tomatoes). It should be spread evenly across the top, without stirring or disturbing the sarmale that are already in the slow cooker. The best way to do this with tomato paste is to spoon out a little of the liquid from the slow cooker into a small bowl and mix it together with the tomato paste. The result can then easily be poured back into the slow cooker. Replace the lid and turn up the temperature to bring the contents back to a boil, and then turn it down again. 

When they are ready, they can be served with sour cream on top and bread or mamaliga (polenta).


Poftă bună!


Thursday, August 31, 2017

Squash soup


Ingredients

2 pounds of squash cut in squares 
2 big potatoes
1 carrot
4 celery sticks  
1 red, or orange pepper
1 medium onion
Half a teaspoon crushed hot red pepper/chili 
1 small bay leaf 
8-10 medium basil leaves or 1/2 tsp of dry basil
Fresh parsley to garnish
Salt and pepper 
2 liters of water
8 oz (225 g) heavy whipping cream 

Instructions

This is not a Romanian recipes, but it can be adapted to Romanian squashes (what we call dovleacel). I discovered this wonderful kind of soup in the United States, and not long after I learned just how many delicious varieties of winter squash there are in this country, each with their own distinctive characteristics that make it hard to choose just one favorite. But that actually makes winter squash soup all the more delightful - you can choose a different variety of squash each time and never get bored!

Take the squash (in this case I used butternut, but turban and other varieties of winter squash also work well), cut it in half, and remove the seeds and stringy parts from inside, discarding them. Cut the rest into squares (roughly 5"x5") and cook them in the microwave (in mine it is 6 minutes per square of squash, but different microwaves will require different cooking times). If you have room, you can cook the two potatoes at the same time.

If you do not have a microwave, you can do this step in a regular oven at high temperature for an hour or so.

Chop the vegetables, then combine all the rest of the ingredients except for the cream and fresh herbs in a pot with a capacity of at least 4 liters. Boil them. I use a pressure cooker because it is faster - this step can be done in 5-10 minutes including cooling time. 

When the squash and potatoes are cooked, remove them from the oven and allow them to cool off. Scoop out the soft parts, leaving the peels behind, and mash them with a potato masher or similar utensil. 

When the vegetable stock is finished cooking, put it in the blender to turn it into a cream. Then combine the creamy stock and the mashed squash and potato back in the large pot. Add the cream and the fresh basil and parsley (chopped).


Sunday, April 2, 2017

Donuts


This recipie is a mix of Romanian and American approaches to making donuts. Romanian donuts are called 'gogosi'. They are spherical and empty inside made from yeast dough. I like the shape of American donuts better, since frying them evenly is easier. And in case you didn't know, that was why that donut shape was invented in the first place!

Here are the ingredients: 

500 g all purpose flour
1 package dry yeast (10 g)
50 g melted butter
2 eggs
250 lukewarm milk 
1/2 teaspoon salt
1teaspoon sugar 
1 spoonful yogurt
Vegetable oil (for frying)

Mix together yeast, milk, sugar and a third of the flour. Let it stay covered in a warm place for 15 minutes or until it becomes foamy. Then add all the other ingredients and start the kneading. I mixed mine for around 10 minutes (at speed 2 if you are using a KitchenAid stand mixer). 


Cover the dough and let it rise in a warm place for an hour, or until the dough has doubled in size. Then take it from the mixing bowl (as a whole big lump all at once) and stretch it on a wooden board that had been greased in advance with vegetable oil.


Cut the donuts as shown in the picture above. If you do not have a donut cutter, you can use a glass and a thimble (or better, a one-inch plastic container of the kind used for rolls of film) to create the shape. Remove the dough from the donut holes and in between the donuts. Make that extra dough into a ball, place it back in the mixing bowl, and let it rise again for half an hour, and at that time repeat the above steps with that dough. Also leave the now-separated donuts to rise for half an hour.

In the meantime, heat oil to medium-high - in a small saucepan if you want to make them one at a time, in a Dutch oven or frying pan if you want to fry more than one at a time.


Place the unfried donut in the oil, being careful not to splash. Use a fork to turn and then flip the donut. A minute or at most two should be enough time for it to fry on a given side. Then take it out and put it in a glass or ceramic dish so that any excess oil can drip off from it. Repeat these steps until all the donuts are fried.

When they are cold, you can roll them in powdered sugar (to make them really good, add a little vanilla to the sugar). Or you can make icing. Here are the recipes:

Maple icing:

Ingredients:
1 cup confectionary sugar (with cornstarch)
a drop of maple flavor
1 dessertspoonful of milk

Mix them together to make a paste.


Place it in the microwave for 10 seconds, then spread it on the donuts.

For chocolate icing, use the above recipe but substitute a level teaspoon of cocoa powder in place of the maple flavoring.

Let the icing cool if you can bear to wait...


Saturday, August 27, 2016

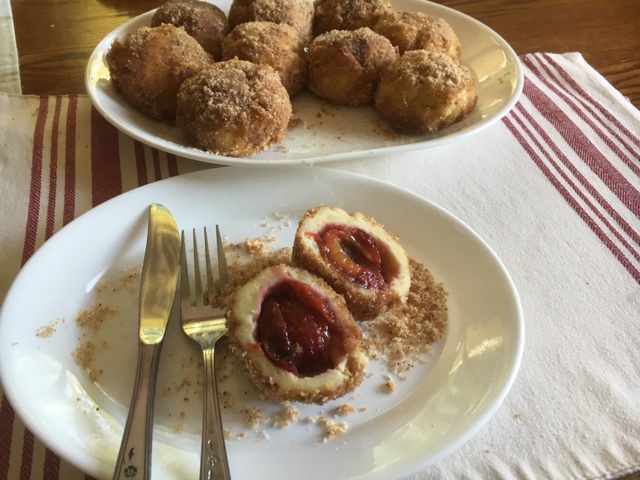
Plum dumplings


For this recipe you need prune plums, which should be hard, small (not much larger than the size of a walnut) and ripe (the colour shoud be purple-blue). Here is a picture of what I used for this recipe.

Ingredients:

1 lb prune plums (500g) 12-15 pieces
1 1/2 lb potatoes (700 g)
10 oz (250 g) all purpose flour (plus extra flour to coat the work surface when making the dumplings) 
2 eggs
4 Tbs. vegetable oil
4 oz (100 g) butter
6 oz (150 g) plain breadcrumbs
6 oz sugar (150 g)
Salt
Vanilla sugar or vanilla essence

Instructions:
Wash and boil the potatoes for 25-30 minutes. The best potatoes are red ones, but any that are sticky rather than fluffy after boiling will work. Drain them and allow them to cool. After that, peel and mash them, adding salt. Then add the vegetable oil. Beat the 2 eggs, then add them to the potatoes as well. Next add the 10 oz of flour. Stir the mixture until all ingredients are incorporated. The dough should be sticky, as it is in the picture below. 

In the meantime, wash and dry the plums. Then open them by squeezing the ends together in order to remove the pits. If you cannot remove the pits in this way, cutting them part way is also an acceptable method of removing the pits from the plums. But ideally the two halves of the plum should not be separated from one another.

With a spoon, take a portion of the dough and place it on a floured surface. Flatten it into a circle as you see in the photo below.


Place a plum in the center of the dough circle and then pull up the dough around it to cover it.


Do likewise with all the plums.


It takes skill and practice to finish the dough and the plums at the same time! The first time you try the recipe, there is a good chance that you will have plums or dough left over.

While you are making the dumplings, put a large (6-8 quart) pot of water to boil. Once the dumplings are prepared, and the water is boiling, place a batch of dumplings in the water. Gently keep them moving with a slotted spoon to ensure that they do not stick to the bottom. Boil for 15 minutes at medium-high temperature. 


After they have been boiled, they need to be rolled in a mixture of breadcrumbs and sugar. And so either before you start making the dumplings, or while you are waiting for the dumplings to boil, melt the butter in a pan on low heat, and add to it the breadcrumbs, sugar, and vanilla. These ingredients are just being toasted lightly, so be careful not to burn them! When the dumplings are ready, place one or two at a time in the breadcrumb mixture and roll them through it. Continue until all the dumplings have been coated. Don't worry if you have breadcrumb mixture left over - it is good to spoon more of the mixture over dumplings when you eat them.


Serve them warm. We just had them basically as dinner and dessert all rolled into one!


Wednesday, May 25, 2016

Bagels


I was introduced to eating bagels in New York, which is arguably the home of the world's best bagels. But I learned how to make bagels as good as the ones I had eaten in New York from an Australian friend! Being able to make my own bagels revolutionized my life, although it also made it harder to enjoy storebought alternatives many of which contain preservatives or for whatever reason simply don't taste the delicious way that bagels ought to.

Below you will find instructions for the two main kinds of bagels that I make, cinnamon raisin and onion. You can also omit those options and make plain bagels, which I also sometimes do. But the basic recipe can be adapted, adding poppy seeds, sesame seeds, or cinnamon and sugar on the tops of them, or chocolate chips inside them, or any number of other variations.

Ingredients:

8 cups high-gluten bread flour such as Baker's Roses or King Arthur (1600 g)
1 tablespoon (1 oz/25g) yeast
3 tablespoons (3 oz/75g) sugar
1 tablespoon (1 oz/25g) salt
2 eggs
2 1/2 mugs (3 1/2 cups) of warm milk
1 serving spoonful of yogurt
1/4 cup vegetable oil

For cinnamon raisin bagels add:
1 1/2 cups of raisins
2 tablespoons cinnamon

For onion bagels:
2 spoonfuls dried onion

1 beaten egg for glazing


Instructions:
Mix the warm milk and yeast together with most but not all of the flour (leave approximately a cup set aside). Add the eggs at room temperature, yogurt, salt, and sugar. Put your stand mixer on speed 1 and mix it for 6 minutes. Then warm the oil and add it little by little while the mixer is still going. The consistency of the dough should be hard like play-dough, harder than for bread. If it is not hard enough, add the remaining flour, or even more if necessary.

When the dough is shiny and not sticky any longer, divide the dough in two parts, 1/3 and 2/3 of the total amount. Place the 1/3 sized portion in a separate bowl, and leave the 2/3 sized portion in the mixer. To the 2/3 portion of dough, add the cinnamon and raisins, and keep mixing at speed 2 until they are completely incorporated. To the other 1/3 add the onion. There is no need to place it back in the mixer, although if you have a second bowl for your stand mixer you may do so. Otherwise mix it by hand until the onion is incorporated.


Cover each bowl with a damp paper towel, and let the dough rise in a warm place for an hour or until it has doubled in size. Then place it on a wooden work surface, starting with the cinnamon raisin batch, and divide it into 12 pieces of roughly equal size. Each should weigh around 8 oz (200g). 


Above is a photo of the phases that the separate balls of dough go through. After separating the pieces into balls, roll them into cylinders/sticks roughly 6-7 inches in length, and then join them into rings, dipping the ends into a dish with a tiny amount of water in it, just enough to moisten them so that they adhere but not so much as to make the dough become more generally sticky. Press the ends together as shown below.


Repeat the process described above with the onion dough, which should yield six bagels. Let all the rings rise on trays dusted with flour for an hour. 


After that, fill a large pot roughly 2/3 full with water. Salt the water slightly and bring it to a boil. When the water is boiling fervently, place 3 bagels at a time in the water and boil them for 5-6 minutes, stirring them around in the pot occasionally. Then remove them with a slotted spoon and return them to the trays they were on, to drain. Repeat with as many of the bagels will fit on your baking trays (in my case that is about 9 of them). 


After they are drained, glaze them with beaten egg. Grease the baking trays with butter and place the bagels on them. Place them in an oven that has been preheated to 375° F (190° C) for 35 or 40 minutes. When they are done remove them and repeat the above process with the next batch, boiling, draining, glazing, and baking them as described. This entire process should be done very quickly. 


The photo above shows what they look like before they have been placed in the oven, and below is a photo of them after they have been baked.


That's what the final product looks like. Once they have cooled at least a little, you can eat them with cream cheese and lox, jam, or whatever else you like to put on them. You can freeze them and defrost them when you need them and they will be as good as if they were fresh out of the oven. I recommend slicing them before freezing them - then you can defrost them in the toaster.

Let me know how yours turn out!


Saturday, February 27, 2016

Yorkshire Puddings


There are people outside of the United Kingdom who have never tasted a Yorkshire Pudding. I was one of those people until I lived in Britain and first enjoyed eating them, and then learned how to make them. They are a real treat that deserves to spread to other parts of the world. 

They are traditionally accompanied with roast beef and vegetables. These are not sweet puddings, if that is what the word "pudding" means to you. These are more like american biscuits that get eaten with gravy, but they are hollow inside, light and fluffy but also crispy on the outside. They are best when eaten freshly-made. Even some people in England struggle to get them to turn out just right. This recipe, if followed precisely, should work every time. I was taught by an English friend, and then adapted the recipe for the tray that I have. You can use a standard non-stick muffin or cupcake tray to make them.

Ingredients:

3 large eggs
1 1/2 cups milk
2 cups all-purpose flour
A pinch of salt
Vegetable oil for baking

Preheat the oven to 450° F or 230 ° C (it makes sense to do this after you have roasted the beef). Put approximately a teaspoon of oil in each of the twelve spots in the tray and place the tray in the oven for at least 5-7 minutes at that temperature.

In the meantime, mix the eggs, milk, flour, and salt with a mixer until it is homogenized into a batter. 

Take the tray from the oven and very quickly (this is the key to them turning out perfectly!) pour batter in each spot in the tray, until it reaches almost to the top, as shown in this photo.


Return the tray to the oven and leave it in for 30-35 minutes. When they are done, they should look like this:


Take them out of the oven when the vegetables, gravy, and other items are ready to be served. My husband always makes a slit in the top of each one on his plate with his knife, so that the gravy goes inside when it is poured over them. 


Sunday, January 31, 2016

How To Make a PERFECT Apple Pie


This apple pie is simply delicious. There are obviously lots of different and yet perfectly good ways to make an apple pie. But the results of this recipe are particularly exquisite, and make the perfect culmination to a special meal. More than 20 years ago, when I lived in England, I learned an excellent pie recipe from a professional chef, which I then further developed and improved into the one I am sharing here. The key to a really good pie is the crust. It is made from milk, flour and butter (at least 80% fat). You can make this crust for any fruit pie. If the fruit in the pie is of a kind that is juicier than apples are, simply use more corn starch (see the recipe below).

For the crust you need:

1 stick butter (125 g)
8 oz all purpose flour (240 g)
2oz (50 ml) cold milk
a pinch of salt

Place the flour, butter, and salt in a bowl, and with your hand crumble the butter together with the flour until it is all like a sandy mixture. Add the cold milk and mix it for few minutes until the dough is sticking together. Divide it in two unequal parts (1/3 in one ball of dough and 2/3 in the other).

Leave the dough at the room temperature while you cook the apples.

You need 2 lb (1kg) apples (Granny Smith, Jonathan, or any hard and tart variety)
1 1/3  cups of sugar (300 g)
1 Tbsp of lemon juice
1 tsp of cinnamon powder

1 Tbs corn starch


Peel the apples and cut them into small pieces. Place them in a pan together with the sugar and lemon juice. Turn the heat on medium. Stir it until it leaves a little juice, then place the lid on and leave it to simmer for 3-5 minutes until the apples soften just slightly. 


Then add the cinnamon powder and stir it once or twice. You do not want the apples mushy, so try not to stir them too much. Now they are ready to be put into the pie crust.

Turn the oven on at 425° F (230°C). 

In the meantime, on a floured surface with a rolling pin stretch the bigger ball of dough into a round shape and put it on a 9 1/2 inches oven-proof glass dish. Put the corn starch onto the unbaked pie crust in the dish and spread it evenly over the bottom. Then gently pour in the apples. 


Stretch the second ball of dough and place it on the apples. If you have a pastry cutter you can make holes in it first, as I did, or you can just simply poke it with a fork so the steam can get out. With your fingers, stick together the bottom and the top sheet of dough. Sprinkle 1-2 Tbsp of sugar on top of the pie.


Place the pie on the top rack of the oven at 425° F (230°C) and bake it for 20 minutes, then reduce the temperature to 350° F (150°C) and bake it for another 20 minutes. 

Turn off the oven and let it stay there for another half an hour. When it is ready it should look like this:


Serve it with whipped cream or vanilla ice cream.


Wednesday, January 6, 2016

Chicken Soup with Rice and Vegetables


This is a Romanian recipe, in fact it was passed down from my mother. It is really simple to make it, though getting the final taste to be just perfect it is quite hard to accomplish, and it has taken me years to get it just the way my mom used to make it. 

In Romania there are two kinds of soups. One type, called supa, is clear and typically has noodles or dumplings in it. The second type, called ciorba, is a sour soup because it features whey (the watery part that separates out from homemade yogurt), sour cream, lemon juice, and/or what Romanians call "borsch" (made from fermented bran), any or all of which give the soup a slight tangy taste that makes it quite distinct from the other kind of soup in terms of its flavor. Indeed, this distinctive element of Romanian soups earned them a mention in a book on the best soups in the world.

The soup in the picture is the latter kind, you'll be pleased to hear, and you can make it without needed to ferment bran. Lots of Romanian cooks nowadays opt for alternatives to the really old-fashioned way of doing this. But my recipe will get you as close to that traditional Romanian flavor as it is possible to get while still using readily available ingredients. 

Ingredients (for about 6 servings): 

1 lb split chicken breast (on the bone)
2 small carrots (or 1 large carrot)
4 celery sticks 
1 small onion
1 Tbs. salt 
2 Tbs. of rice
2-3 Tbs. lemon juice
2-3 Tbs. sauerkraut juice
6-7 cups (1 1/2 -2 l) of water
Parsley, finely chopped


Take the skin off from the chicken breast and place the chicken in a big pot. Pour the water and the salt over the chicken. Turn the heat on high. Separately chop the onion, celery and the carrots with the food processor and put them into the pot when the water is boiling. Add the rice too and stir. Cover the pot and let it simmer for about an hour. Add more water if it is necessary, to keep it at roughly the same level during the time when it is boiling. You can use a pressure cooker if you have one and let it boil for only 20 minutes. When the soup is cooked, take the lid off, take the chicken out (try and get it out in one piece if you can), then add the sauerkraut juice, lemon juice, and parsley, and let it boil one more minute. When the chicken is cold enough, take it from the bones and put it back in the soup in small, bite-sized pieces. Serve it with a dollop of sour cream in it. 

Makes about 6 servings. The soup can safely be kept in the fridge for several days.