Monday, September 7, 2026

Salmon Chowder

 My family loves seafood, but we don't live that close to the sea. Fortunately we can get good seafood nonetheless. Salmon is a favorite of ours. One day when shopping I happened to come across salmon cubes, and wondered what I might make with them. Looking online, I found a recipe for salmon chowder that served as the inspiration for this one. My family likes clam chowder, and we love salmon, and so salmon chowder seemed worth trying. Not only was it good, it is their new favorite soup of mine. They'd prefer my salmon chowder to clam chowder or even lobster bisque! If you like seafood, you're going to love this soup.


This recipe makes 6 servings if served as a starter. If it is the main course then I'd say it serves 4. 

Ingredients:


1 lb fresh skinless salmon cubes, roughly 1/2"-1" in size

4 Tbsp (100 g) butter

1 medium onion

4 cloves garlic 

2 medium baked potatoes

1 small bay leaf 

1 Tbsp flour 

2 cups milk or half & half

1/2 cup heavy cream

3+ cups chicken stock

parsley

1 tsp crushed red pepper flakes

 salt 

black pepper 

Instructions:

In a large pot (2 quarts) melt the butter and fry the onion, garlic, and red pepper flakes in the butter with the bay leaf until the onion is golden. Add the flour and stir until it is entirely incorporated. Reduce the heat and add the milk (or half and half) a little at a time, stirring continually, to make a white sauce. Add the cream, stir, then add the salmon. Continue stirring continuously for 15-20 minutes or until the salmon is completely cooked. Scoop out the insides of the baked (microwaved) potatoes and add them without the skins to the chowder.

Add the chicken stock a little at a time until you have the desired consistency. Add the parsley, plus salt and pepper to taste, and cook another 10 minutes, continuing to stir. 

(Did I mention that you shouldn't forget to stir?)

After you try it, please share this recipe with others, and please leave a comment to let me know how much you enjoyed it!


Thursday, July 4, 2024

Indian Chicken Soup


This is a delicious spicy soup that my family never gets tired of eating.  


Ingredients

 6 chicken drumsticks

or 2 chicken breast split (with bones and skin)

1 medium onion chopped 

4 celery sticks chopped

1 jalapeño pepper (medium hot) chopped

1 small carrot chopped

1 tomato chopped

Half a teaspoon grated ginger root

A spoonful of lemon juice (or more, to taste)

1 teaspoon tomato paste

2 curry leaves

cilantro (coriander) leaves

Spices

1 teaspoon turmeric

1 teaspoon ground coriander seeds

1 teaspoon methi (fenugreek) leaves

1 teaspoon ground cumin 

10-12 crushed red pepper flakes

1 tablespoon salt (leveled)


Recipe:

Pour 3 liters of water into a 4 liter pressure cooker. Add the chicken, onion, tomato, jalapeño pepper, ginger, curry leaves, methi leaves, and spices (including salt). Boil for half an hour. Cool off until lid can be removed safely, then add celery and carrot. Return to boil with the lid on for another 5 minutes or so. Add chopped cilantro leaves, lemon juice, and tomato paste at the end and continue cooking for another 2 minutes or so without the lid, stirring occasionally. 

When the soup is ready, remove the chicken with a slotted spoon, let it cool, and remove the meat which should be returned to the soup.

(You can use any pot with a lid to cook the soup, simply extend the boiling time for the chicken accordingly, at least 40-50 minutes.)

You're sure to enjoy this. Let me know if it becomes one of your favorite recipes the way it has for me. I had a soup like this at an Indian restaurant but this is my own adaptation based on what they served. 


Thursday, December 10, 2020

Homemade Raffaello


 Here is a Romanian version of the popular Raffaello sweets. They have coconut and do not require baking. It is a very rich dessert but each bite is worth it. It is tasty and satisfying. I want to give credit to my niece Cami Grama in Romania who shared her own version of the recipe with me, inspiring me to develop this version made in America using ingredients available here. 

Here are the ingredients:

200 g unsalted butter

200 g powdered sugar

200 g nonfat dry milk 

1/3 cup heavy cream 

100 g coconut flakes (plus another 25 g to coat them) 

6 packets of vanilla sugar (or 1 spoonful vanilla essence)

Around 50 raw almonds

Toast the almonds in a pan for 2-3 minutes in a little butter, then turn off the heat and allow them to cool.

Using a mixer, beat the butter and powdered sugar until they become fluffy. Add the coconut flakes (except for the small amount set aside to coat them at the end), then the vanilla sugar, then the dry milk. Finally add the cream. Continue beating until it is firm with an even consistency. 

Make balls the size of small walnuts by rolling a spoonful of the mixture between your palms. Insert an  almond, pushing it to the center of the ball. Roll again to smooth out the exterior and perfect the shape of the ball. Each ball then gets rolled in coconut until each call is coated with coconut embedded in its exterior. Once they are all ready, place them in the refrigerator to harden. 


When they have stayed in the fridge a couple of hours, they are ready to enjoy, and you'll agree they were well worth the wait.

Saturday, April 11, 2020

Cozonac

Cozonac is a quintessentially Romanian baked item made for Easter and Christmas in particular, but also for other holidays and celebrations. I know many Romanians who don't dare to try baking cozonac because they think there are many things that can go wrong. So they leave it for their grandmothers and mothers to make it for them. The secret of making good cozonac is a warm kitchen, warm utensils, and warm ingredients, since the dough is based on live yeast which needs consistent warmth in order to be active.

Here are the ingredients I use:


For the dough:
1 kg flour (at least 11% gluten, the higher the better)
300 g sugar
250 ml milk
4 large eggs
125 g butter
vanilla
lemon zest (grated lemon peel)
15 g salt (not shown in photo!)
1 package of 10-15 g dried yeast

For the filling one can use a number of different things, such as cinnamon or Turkish delight, but the classic version is with walnuts and that is what I provide here.

For the walnut mixture:
200 g grated walnuts
200 g sugar
vanilla essence
rum essence (or alternatively maple essence)


Heat 100 ml of the milk until warm. Pour it into the bowl of your stand mixer (unless you are kneading it by hand). From the flour add 2-3 tablespoons of flour. Add the yeast and stir until the ingredients are combined. Let it stand for half an hour.


Add the rest of the flour to the bowl. Next add the eggs, sugar, lemon zest, vanilla, and salt. Warm the remainder of the milk and pour it over the other ingredients. The milk should not be hot but should be warmer than room temperature. Begin mixing with the stand mixer. Melt butter and pour it at warm temperature into the mixing dough. Continue mixing until it looks like this:


It should take approximately 10 minutes on speed 2 to reach this point.

Cover the bowl with a moistened tea towel or paper towel, wrap it in a warm tea towel, and put it in a warm place to let it rise for at least an hour and a half.


Allow the dough to double in size. Take it out and divide it into 4 equal portions. Place them on a work surface (such as a rolling board) that has been sprinkled with flour. You can use wax paper if you wish.


Let them stand there for another half an hour to raise further. In the meantime butter the baking trays thoroughly.


Take one portion and divide it in two. Stretch one of the two pieces into a rectangle roughly 30x20 cm. Cover them (not all the way to the edges) with 1/8 of the walnut mixture and roll it up.


(I tried adding the beaten egg white to the walnut mixture and it clumped, which it normally wouldn't have, so I'm leaving out that step for when you do it! I also included a photo above of one I made filled with cinnamon.)

Do the same with the second half of the portion. Then twist them together.


Grab the braided dough from both ends and place it in a baking tray. Do the same with the rest of the dough until you've filled all four baking trays.

The trays with the dough in them should be kept at a warm temperature. I often have them in the oven with the light on, which provides just enough heat to keep them warm. You could also put the oven on at around 35-40° Celsius/100° Fahrenheit. Wait for them to rise further, for about another hour. When they have doubled in size, glaze them on top with egg mixture. For this use one egg yolk and a little bit of milk mixed together. Glaze the cozonacs with a brush.

Return them to the oven and let them rise for another half an hour. Then turn the oven on at 180° Celsius/350° Fahrenheit and bake them for 35-40 minutes.

When they are ready they should look like this (one is with cinnamon which looks different):


Pofta buna!


Sunday, December 9, 2018

Stuffed mushrooms


Ingredients:

12 mushrooms (2-2 1/2" diameter each)
4 oz. (120 g) breadcrumbs
2 eggs
1/3 cup parmesan cheese
1/2 stick celery
1/2 medium onion
1-2 cloves garlic
1 slice bacon
1/3 cup olive oil
10 sprigs fresh of parsley (chopped)
Salt
Pepper

Instructions:
Preheat the oven to 400° F (200° C).

Beat the eggs in a large mixing bowl. Add the breadcrumbs and parmesan cheese and allow them to soak for about 5 minutes.

Stem the mushrooms leaving the caps intact and ready to be filled like cups. Gently twisting the stem may be the best way to accomplish this. 

Place the mushroom stems together with the onion, garlic, and celery in a food processor and chop finely. Dice the bacon by hand, especially if you are using uncooked bacon as this is harder to work with in a food processor. Combine the vegetable mixture with the breadcrumb mixture, adding the diced bacon as well as parsley, black pepper, and salt. Pour most of the oil into the bowl and mix to combine thoroughly. 

With the remaining oil, grease the baking tray so that the mushrooms do not stick.

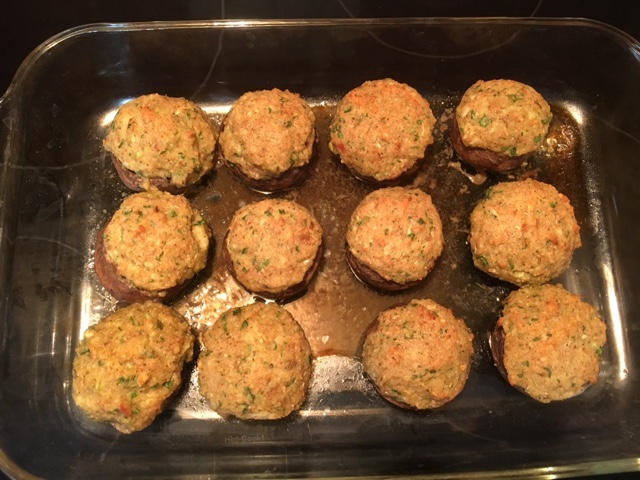
Place the mushroom caps upside down on the baking tray. Fill them generously with the mixture as shown in the photo below.


Bake in the overn for 50 minutes, until they are slightly brown.

Serve and enjoy!


Monday, November 26, 2018

Yeast Crescents


Yeast Crescents

These are based on a recipe which won first place in the Indianapolis Star cookie contest, with some improvements I made, especially to the filling. Some people might prefer to call these "Christmas Crescents," but I see no point in calling them that, since the truth is that they are good all year round! Call them whatever you like, and make them whenever you feel like it!

Makes 40

4 cups of flour (500 g)
1 cup (2 sticks, or 250 g) of butter at room temperature
2 packages active dry yeast (20 g)
2 tablespoons of sugar
1 teaspoon of salt
half cup of milk
2 eggs
Powdered sugar (approx. 1 cup)

For filling: one small jar( 300-400 g ) of apricot jam mixed with 4 ounces ( 100 g) of ground walnuts.


Pour the milk in a microwave safe bowl and heat it for 30-50 sec. The temperature should be around 100° F (37° C). If you do not have a thermometer, you can stick your finger in it - don't worry, all chefs do that! It should be warm, not hot. If it is hot, then just let it cool down. Add the yeast and a tablespoon from the flour and stir it. Let it stay in a warm place around half an hour or until it looks frothy. Add the rest of the flour, eggs, salt, and sugar. Stir it and add the butter. Now you need to knead it for at least 5 minutes. I use a stand mixer (if you don't already have one, these are well worth the investment). Let it sit in a warm place for at least half an hour. It should double in size. Divide the dough into 5 even balls. Roll each ball on a hard surface (you can put a little flour on the work surface to keep it from sticking) into a 12 inch (30 cm) circle. Cut circle into 8 wedges. Place half a teaspoon of filling in the center of each wedge and then spread it. Starting from the widest point, roll each wedge to form a crescent (slightly curving the sides). Bake at 350° F (180° C ) for 20-25 minutes or until light brown on the bottom. Let the cookies cool and then roll them in powdered sugar. 


Wednesday, September 26, 2018

Quince pudding


Very few people in the United States are familiar with quince. Some have heard of it, but few have seen one and even fewer have tasted it. In my native country of Romania, however, quince trees are very common, especially in the south of the country, and the fruit is a staple of our diet. The fruit feels rather like a hard apple, but with a hint of fuzz on it almost (but not quite) like that of a peach. The taste is slightly like pineapple, and if you eat the fruit straight off the tree it might be too tart for your taste. But it is a fruit which, if you stew it, has a flavor that is simply exquisite. And so even if you have tasted a quince, but never tasted quince pudding, you should still give this recipe a try. I would be very surprised if you don't fall in love with its distinctive and delicious flavor.

As long as you actually have quinces (you can buy them seasonally in supermarkets like Meijer and sometimes even Wal-Mart), making quince pudding is fairly straightforward. You will need:

500g quince (or 1 lb) cut in cubes
100g sugar (or 4-5 oz)
1 cup water
1/2 cup milk
2 tablespoons cornstarch
100g butter (or 4-5 oz)
Vanilla essence (a few drops)

After cutting the quince into cubes, use a food processor for just a few seconds to turn it into smaller chunks and pieces. Chop it, but do not turn it into a pulp. This can be done by hand if you wish.


Pour the chopped/diced quince into a saucepan or pot. Add the cup of water and boil it for 10 minutes until the fruit softens. Then add the sugar and boil for a further 2 minutes. Then add the butter, cut into cubes, and stir continually for another minute until the butter is melted.

Separately in another dish, mix the milk and cornstarch. Pour this over the quince mixture in the saucepan and boil for another 2 minutes or until it thickens. Remove from the heat and add the few drops of vanilla, mixing it evenly into the pudding.


Allow the pudding to cool, but (although it is good even when served cold) it is best served warm, ideally with some fresh cream (whipped) on top. This recipe makes about 4 generous portions, and can be refrigerated and reheated the next day.