Sunday, December 18, 2016

Cats' Eyes Cookies


This recipe is, as far as its ingredients and initial procedures are concerned, the same as for Harlequin. And so it is sometimes convenient to make both kinds of cookies at the same time. These work well for children (and grown ups) who would enjoy apricot layer cookies, but without the walnuts that are in Harlequins.

Dough:

150 g sugar (5 1/2 oz)
300 g butter (10 1/2 oz)
1 tsp baking powder
1 egg
400 g all purpose flour (14 oz; plus some additional flour for dusting the workspace)

Mix together the butter and sugar until fluffy, then add the egg, baking powder, and flour. 


Make the dough into a big ball, then divide it in 4. 


Put it in the refrigerator, covered with a paper towel, for 30 minutes or until it is cooled, but not crumbly. Take 1 ball out and stretch it on a floured work top with a rolling pin and make a rectangle 5mm (about 1/5 of an inch) thick. Try not to use a lot of flour, since that will change the consistency and the taste


Using a cookie cutter, cut the dough into circles. Place them all evenly on a lightly greased baking tray.


After they are on the baking tray, use a thimble to cut holes in the center of half of the circles.

Gather up the dough left behind from cutting around the large circles as well as the holes, and combine it back into a ball. Place that ball in the fridge and take an already-cooled ball from the fridge to work with next. Keep going like this until you are done with all the dough, including the leftovers.


Bake them at 350° F/180° C for 10 minutes or until they are lightly brown. Let them cool for just a minute, and then pushing them gently with your finger, transfer them to a cooling rack. Once one batch is cooled, you can stack them to make room for the next batch. 


Using a spoon, place apricot jam on the cookie circles without holes.


Then place a cookie circle with a hole on top.


You'll probably end up with around 50 assembled cookies, more or less, depending on the thickness of the dough.

Dust the assembled cookies with powdered sugar.


Enjoy! These cookies should stay fresh if kept in an airtight container in the refrigerator, even for a couple of weeks. But if you like them crunchy, eat them sooner rather than later, since the jam will soak into the cookies over time.


Saturday, December 10, 2016

Vanilla Walnut Crescents


From all the cookies I have tried making, these are among the best from a variety of perspectives: they are loved by everyone, the favorite of many, and relatively easy to make. The recipe is based on one that I found in a Romanian cookbook by Silvia Jurcovan, Carte de Bucate (Bucuresti: Editura Tehnica, 1983, p.437).

The quantities and temperatures given must be followed precisely - they are not "more or less." For that reason (and not just because the metric system is more widely used) I will give the quantities in grams. 

Ingredients:
250g All-purpose flour
200g unsalted butter
100g finely-ground walnuts
 70g powdered sugar 
   1 packet vanilla sugar
Plus roughly another 100-150g of powdered sugar to coat the cookies in after they are baked.

Vanilla sugar is not widely used in the United States, but most international stores sell it. If you don't have it, you can substitute by adding 1 teaspoon of vanilla essence in the dough. 

Procedure
In a large bowl combine the butter, 70g sugar, and vanilla sugar together until the mixture is fluffy. Then add the flour and walnuts and mix them by hand until the dough sticks together.


Place the bowl with the resulting ball of dough in the refrigerator, covered with a sheet of wax paper. It should stay in the fridge for half an hour or until it is hardened. Then remove the dough from the fridge. Break off pieces and shape them into golf ball sized balls. Then put most of them back in the fridge to stay cold, taking just a couple at a time to work with.

On the wax paper, roll each ball with your hands until they are lengthened into long sticks.


Cut the sticks into pieces 2" in length.


Curve the pieces into crescent shapes and place them on a baking tray (in most cases you will need to lightly grease the baking tray with butter).


Preheat the oven to 350° F (180° C). Place one baking tray with the crescents in the oven for 10-12 minutes. They should be lightly brown, as seen in the picture below.


After removing them from the oven, do not let them cool for more than 2-3 minutes. Then move them gently with your finger to ensure they do not stick to the baking tray. They are very fragile while warm! 

Roll each cookie through powdered sugar until it is evenly coated and place it on a serving tray.


They taste better after they have cooled, but once you know how good they are, it can be hard to be patient!


Monday, November 14, 2016

Harlequin (Apricot and Walnut Bars)


This is a recipe from Romania, which everyone loved every time I made it. In the United States, the reaction has been the same. In 2004, the recipe was a finalist in the Indianapolis Star cookie contest. You are going to enjoy it too, I am certain!


Harlequin recipe


Dough for the layers:

150 g sugar (5 1/2 oz)
300 g butter (10 1/2 oz)
1 tsp baking powder
1 egg
400 g all purpose flour (14 oz; plus some additional flour for dusting the workspace)


Mix together the butter and sugar until fluffy, then add the egg, baking powder, and flour. 


Make the dough into a big ball, then divide it in 4. 


Put it in the refrigerator, covered with a paper towel, for 30 minutes or until it is cooled. Take 1 ball out and stretch it on a floured working top with a rolling pin and make a rectangle of 9 x12 inches. The dough should be cold but not hard before stretching it. Try not to use a lot of flour, since that will change the consistency and the taste


Roll it up on the rolling pin and transfer it onto the baking tray. 


Bake it at 350° F (180° C) for 10-12 minutes. It is ready when it is slightly brown at the edges, as in the picture below. Carefully remove it from the tray while it is still warm, and place it on a rack to cool. You may need to gently slide a knife or spatula between the cake layer and the pan to get it to slide off easily.


Repeat the steps above with the rest of the dough. When the baked sheets are cold, spread apricot jam on one, then place another cake layer on top and repeat, except on the top layer, which will be covered with icing.


Icing:

150 g (5 1/2 oz) chopped walnuts  
4 egg yolks
150 g (5 1/2 oz)  powdered sugar
vanilla essence 


In a pan mix together 4 egg yolks with 150 g (5 1/2 oz) powdered sugar (preferably granulated sugar ground at home into powdered sugar, not sugar bought in powdered form from the store, as it should not have cornstarch in its composition). Place this pan on top of/into another pan with boiling water, and keep stirring until the composition is hot and looks creamy (see picture below.) Then add a few drops of vanilla essence and stir.


When it is done, pour the icing onto the top layer of the cake and immediately scatter the walnuts on it, pressing them down with your palm. 


After a few hours, you can cut it into small bars. 


Note: Making the layers can be really hard and frustrating the first time you try, but don't be discouraged! With practice, this is going to become a favorite recipe that everyone will ask you to make over and over again. 


Saturday, August 27, 2016

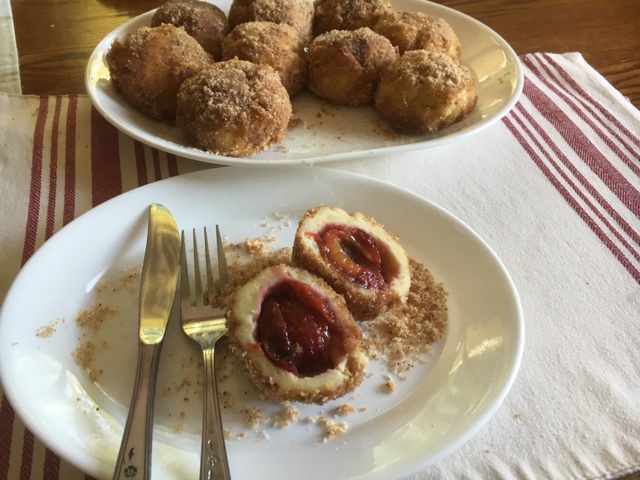
Plum dumplings


For this recipe you need prune plums, which should be hard, small (not much larger than the size of a walnut) and ripe (the colour shoud be purple-blue). Here is a picture of what I used for this recipe.

Ingredients:

1 lb prune plums (500g) 12-15 pieces
1 1/2 lb potatoes (700 g)
10 oz (250 g) all purpose flour (plus extra flour to coat the work surface when making the dumplings) 
2 eggs
4 Tbs. vegetable oil
4 oz (100 g) butter
6 oz (150 g) plain breadcrumbs
6 oz sugar (150 g)
Salt
Vanilla sugar or vanilla essence

Instructions:
Wash and boil the potatoes for 25-30 minutes. The best potatoes are red ones, but any that are sticky rather than fluffy after boiling will work. Drain them and allow them to cool. After that, peel and mash them, adding salt. Then add the vegetable oil. Beat the 2 eggs, then add them to the potatoes as well. Next add the 10 oz of flour. Stir the mixture until all ingredients are incorporated. The dough should be sticky, as it is in the picture below. 

In the meantime, wash and dry the plums. Then open them by squeezing the ends together in order to remove the pits. If you cannot remove the pits in this way, cutting them part way is also an acceptable method of removing the pits from the plums. But ideally the two halves of the plum should not be separated from one another.

With a spoon, take a portion of the dough and place it on a floured surface. Flatten it into a circle as you see in the photo below.


Place a plum in the center of the dough circle and then pull up the dough around it to cover it.


Do likewise with all the plums.


It takes skill and practice to finish the dough and the plums at the same time! The first time you try the recipe, there is a good chance that you will have plums or dough left over.

While you are making the dumplings, put a large (6-8 quart) pot of water to boil. Once the dumplings are prepared, and the water is boiling, place a batch of dumplings in the water. Gently keep them moving with a slotted spoon to ensure that they do not stick to the bottom. Boil for 15 minutes at medium-high temperature. 


After they have been boiled, they need to be rolled in a mixture of breadcrumbs and sugar. And so either before you start making the dumplings, or while you are waiting for the dumplings to boil, melt the butter in a pan on low heat, and add to it the breadcrumbs, sugar, and vanilla. These ingredients are just being toasted lightly, so be careful not to burn them! When the dumplings are ready, place one or two at a time in the breadcrumb mixture and roll them through it. Continue until all the dumplings have been coated. Don't worry if you have breadcrumb mixture left over - it is good to spoon more of the mixture over dumplings when you eat them.


Serve them warm. We just had them basically as dinner and dessert all rolled into one!


Wednesday, May 25, 2016

Bagels


I was introduced to eating bagels in New York, which is arguably the home of the world's best bagels. But I learned how to make bagels as good as the ones I had eaten in New York from an Australian friend! Being able to make my own bagels revolutionized my life, although it also made it harder to enjoy storebought alternatives many of which contain preservatives or for whatever reason simply don't taste the delicious way that bagels ought to.

Below you will find instructions for the two main kinds of bagels that I make, cinnamon raisin and onion. You can also omit those options and make plain bagels, which I also sometimes do. But the basic recipe can be adapted, adding poppy seeds, sesame seeds, or cinnamon and sugar on the tops of them, or chocolate chips inside them, or any number of other variations.

Ingredients:

8 cups high-gluten bread flour such as Baker's Roses or King Arthur (1600 g)
1 tablespoon (1 oz/25g) yeast
3 tablespoons (3 oz/75g) sugar
1 tablespoon (1 oz/25g) salt
2 eggs
2 1/2 mugs (3 1/2 cups) of warm milk
1 serving spoonful of yogurt
1/4 cup vegetable oil

For cinnamon raisin bagels add:
1 1/2 cups of raisins
2 tablespoons cinnamon

For onion bagels:
2 spoonfuls dried onion

1 beaten egg for glazing


Instructions:
Mix the warm milk and yeast together with most but not all of the flour (leave approximately a cup set aside). Add the eggs at room temperature, yogurt, salt, and sugar. Put your stand mixer on speed 1 and mix it for 6 minutes. Then warm the oil and add it little by little while the mixer is still going. The consistency of the dough should be hard like play-dough, harder than for bread. If it is not hard enough, add the remaining flour, or even more if necessary.

When the dough is shiny and not sticky any longer, divide the dough in two parts, 1/3 and 2/3 of the total amount. Place the 1/3 sized portion in a separate bowl, and leave the 2/3 sized portion in the mixer. To the 2/3 portion of dough, add the cinnamon and raisins, and keep mixing at speed 2 until they are completely incorporated. To the other 1/3 add the onion. There is no need to place it back in the mixer, although if you have a second bowl for your stand mixer you may do so. Otherwise mix it by hand until the onion is incorporated.


Cover each bowl with a damp paper towel, and let the dough rise in a warm place for an hour or until it has doubled in size. Then place it on a wooden work surface, starting with the cinnamon raisin batch, and divide it into 12 pieces of roughly equal size. Each should weigh around 8 oz (200g). 


Above is a photo of the phases that the separate balls of dough go through. After separating the pieces into balls, roll them into cylinders/sticks roughly 6-7 inches in length, and then join them into rings, dipping the ends into a dish with a tiny amount of water in it, just enough to moisten them so that they adhere but not so much as to make the dough become more generally sticky. Press the ends together as shown below.


Repeat the process described above with the onion dough, which should yield six bagels. Let all the rings rise on trays dusted with flour for an hour. 


After that, fill a large pot roughly 2/3 full with water. Salt the water slightly and bring it to a boil. When the water is boiling fervently, place 3 bagels at a time in the water and boil them for 5-6 minutes, stirring them around in the pot occasionally. Then remove them with a slotted spoon and return them to the trays they were on, to drain. Repeat with as many of the bagels will fit on your baking trays (in my case that is about 9 of them). 


After they are drained, glaze them with beaten egg. Grease the baking trays with butter and place the bagels on them. Place them in an oven that has been preheated to 375° F (190° C) for 35 or 40 minutes. When they are done remove them and repeat the above process with the next batch, boiling, draining, glazing, and baking them as described. This entire process should be done very quickly. 


The photo above shows what they look like before they have been placed in the oven, and below is a photo of them after they have been baked.


That's what the final product looks like. Once they have cooled at least a little, you can eat them with cream cheese and lox, jam, or whatever else you like to put on them. You can freeze them and defrost them when you need them and they will be as good as if they were fresh out of the oven. I recommend slicing them before freezing them - then you can defrost them in the toaster.

Let me know how yours turn out!